Snapwear × Teeinblue for Shopify

Sell personalized print-on-demand products on Shopify

Let customers personalize products in real time. Teeinblue powers the customization experience, while Snapwear prints, packs and ships every order.

Live personalizationNo inventoryAutomatic print filesFactory fulfillment

Perfect for personalized apparel, posters, gifts and made-to-order products.

Family holding a personalized poster created with Teeinblue and fulfilled by Snapwear

Why personalization matters

A product feels more valuable when it was made for someone

A name, meaningful date, photo or personal message turns a standard product into something connected to a person, memory or relationship. Customers are no longer choosing only a T-shirt, mug or gift — they are choosing what that product represents.

Personalization changes the conversation from “Do I need this?” to “Who would this be perfect for?”

01

More emotional value

A product linked to a name, story or shared moment feels unique and harder to replace with a generic alternative.

02

Stronger gift potential

Personalized products naturally fit birthdays, holidays, weddings, family occasions and other high-intent purchases.

03

Higher perceived value

Customers see more than the base product. They also value the individual choice, creative input and personal meaning added to it.

04

A memorable buying experience

Seeing the product change live makes shopping more engaging and helps customers feel involved in creating the final result.

What the integration gives you

Personalization without adding manual work to every order

Teeinblue creates the customer-facing personalization experience, while Snapwear turns the approved design into a finished product and ships it directly to the buyer.

01

Live personalization

Customers can preview names, photos, text and selected design elements before they add the product to cart.

02

Print-ready files

Teeinblue generates the personalized artwork needed for production, helping reduce repetitive file preparation.

03

Automated fulfillment

Orders flow through Shopify to Snapwear, where products are printed, packed and shipped directly to the buyer.

04

No inventory risk

Products are made only after purchase, so you can test personalized ideas without buying stock upfront.

Personalization options

Give customers creative control — without giving up production control

Build simple name-based gifts or more advanced designs with image uploads, conditional choices and multiple layout templates.

01
Custom text and names

Set default text, available fonts, character limits and color options.

02
Photo and image uploads

Let customers upload their own photos, logos or artwork directly on the product page.

03
Conditional layers and choices

Show different people, pets, poses, colors or layouts based on customer selections.

04
Live storefront preview

Help customers confirm their design before checkout and reduce uncertainty around custom orders.

Snapwear, Shopify and Teeinblue personalized print-on-demand workflow
Interactive artworkOne design can support multiple customer choices and layouts.

Step-by-step setup

Connect Snapwear and Teeinblue through Shopify

Follow the complete setup from creating a blank Snapwear product to launching a personalized campaign in Shopify. Each step below follows the workflow described in our integration guide.

Step 01

Connect Shopify with Snapwear and install Teeinblue

First, make sure the Shopify store you want to use is already connected to your Snapwear account. Then install the Teeinblue Product Personalizer app from the Shopify App Store in the same store.

Both apps must work with the same Shopify store
Connecting Shopify, Teeinblue and Snapwear in the first integration step
Step 02

Start a blank product in Snapwear

Log in to your Snapwear dashboard, open My Assortment and click Create blank. A blank product acts as the production base that will later be connected with the personalized Teeinblue campaign.

Use Create blank — not Add product
Create blank option in the Snapwear My Assortment dashboard
Step 03

Choose the product, variants and print placement

Name the product, select the Snapwear item and choose the colors you want to offer. Select the print placement — front, back or both sides — set your retail price and save the product.

Hold SHIFT when selecting multiple color variants
Snapwear create blank product form with product and print placement options
Step 04

Publish the blank product to Shopify

After saving, the product appears in My Assortment with the status Unpublished. Click Publish to send the blank product and its variants to your connected Shopify store.

Wait until the product status changes to Published
Unpublished Snapwear product with Publish button
Step 05

Check that the product is visible in Shopify

Open the Shopify admin and go to Products. Confirm that the blank product published from Snapwear is listed there, including the expected variants and Snapwear vendor information.

Do not create a second copy manually in Shopify
Blank Snapwear product visible in the Shopify products dashboard
Step 06

Create the artwork and personalization in Teeinblue

Open Teeinblue and go to Artworks. Click + New Artwork to build the design from scratch or upload a PSD. Set the canvas to the correct Snapwear print area, add layers and configure editable text, images, colors, conditions or templates.

For reliable sizing, build the artwork at the real 1:1 print dimensionsDownload the official product templates ↗
Creating a new personalized artwork in Teeinblue
Step 07

Create a campaign by Shopify product

In Teeinblue, open Campaigns, choose by Shopify products and click + New campaign. This campaign type lets you add personalization to the existing product already published by Snapwear.

Use “by Shopify products” for Snapwear products
Teeinblue campaigns by Shopify products page
Step 08

Select the product published from Snapwear

Click the + icon, choose the blank product from your Shopify product list and confirm it with Create. Check the vendor column to make sure you are selecting the product supplied by Snapwear.

The correct product should show Snapwear as the vendor
Selecting a Snapwear product for a new Teeinblue Shopify campaign
Step 09

Add the artwork and upload the product mockup

Inside the new campaign, click + Select artwork and choose the personalized artwork you prepared earlier. Then click Upload mockup and add the product image that customers will see in the live preview.

The artwork controls personalization; the mockup controls the visual preview
Adding personalized artwork and uploading a product mockup in Teeinblue
Step 10

Open the mockup editor

Click the pencil icon in the top-right corner of the mockup image. This opens the editor where you can position the personalized artwork on the product and adjust how it appears in the storefront preview.

The pencil icon appears directly on the mockup preview
Pencil icon used to open the Teeinblue mockup editor
Step 11

Position the artwork and prepare color previews

Adjust the design size and placement so the preview matches the real Snapwear print area. Create separate mockups when different color variants need different previews, then save the setup using Save & Close.

Keep the preview aligned with the production template — not just visually centred
Positioning personalized artwork in the Teeinblue mockup editor
Step 12

Save and launch the personalized campaign

Return to the campaign, review the personalization form and preview, then click Launch. The personalized product becomes available in your Shopify store and can begin accepting custom orders.

Preview and test the customization before opening the product to customers
Ready Teeinblue personalized product campaign with Launch button
Step 13

Set how the order design URL is passed to Shopify

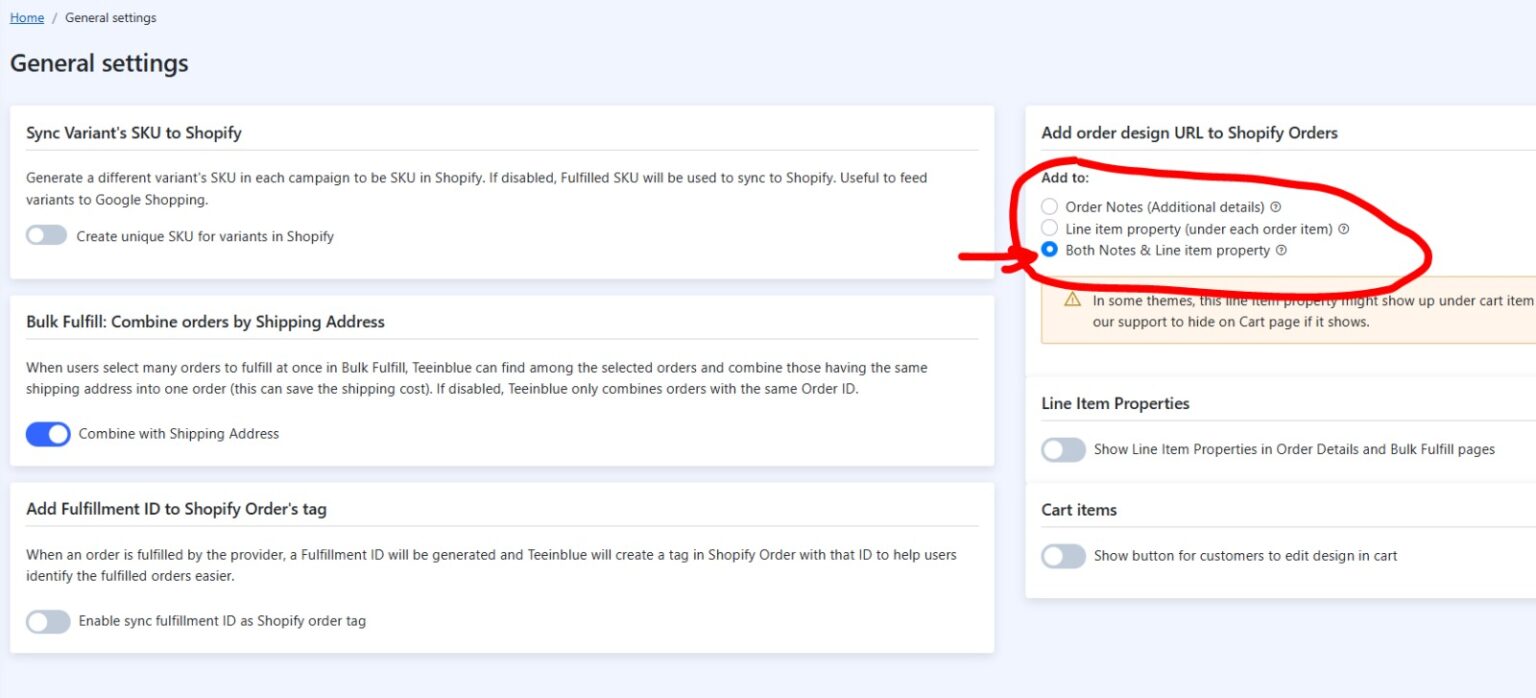
Before accepting real orders, open Teeinblue General settings. In Add order design URL to Shopify Orders, select Both Notes & Line item property. This ensures that Snapwear receives the personalization information required for production.

Required setting: Both Notes & Line item property
Teeinblue order design URL setting configured as Both Notes and Line item property

After the customer clicks buy

From personalized preview to a finished product

Once the campaign is configured correctly, the personalized order can move through the workflow without manual recreation of the customer's design.

01Customer personalizes

The buyer edits the product and sees the result on the Shopify product page.

02Shopify receives the order

Product variant and personalization details are saved with the order.

03Teeinblue generates the file

The final design and order design URL are prepared for fulfillment.

04Snapwear produces

The product is printed in Snapwear's owned production workflow.

05Order ships directly

The finished order is packed and sent to your customer.

What you need

Two tools, one automated personalized POD workflow

Snapwear handles production and fulfillment. Teeinblue adds the advanced personalization layer inside Shopify.

Snapwear

Production & fulfillment

€0

No monthly Snapwear subscription. You pay for the product, selected add-ons and shipping when an order is placed.

Teeinblue pricing and terms are controlled by Teeinblue and may change. Confirm the current offer in the Shopify App Store before installing.

Learn and connect

Continue your Teeinblue and Shopify setup

Explore practical Teeinblue tutorials for building personalized products, then follow the Shopify integration guide to connect your store with Snapwear.

Teeinblue tutorials

Learn how to build personalized products

Watch Teeinblue guides covering artworks, campaigns, personalization options, mockups and product setup.

Explore Teeinblue tutorials ↗

Shopify connection

Connect your Shopify store with Snapwear

Follow the dedicated setup guide to connect Shopify, publish Snapwear products and automate print-on-demand fulfillment.

See the Shopify integration guide

Personalization guide

Build your first production-ready personalized product

Use the Snapwear × Teeinblue Personalization Starter Pack to prepare artwork, configure customer choices, build DTG and AOP products, create realistic mockups and test the final design before launch.

01

Artwork & personalization

Prepare the correct canvas, separate fixed and editable elements and organize swappable graphics before building the personalization in Teeinblue.

Canvas size · layers · assets · customer choices
02

DTG & AOP setup

Follow the workflow for the production method you are using, from standard print areas to dedicated AOP production templates and product panels.

Print areas · templates · DTG · sublimation · AOP
03

Mockups & testing

Build a customer-facing preview that reflects the real product, then generate and verify the final order design before opening the campaign to customers.

Mockups · masks · live preview · test design · launch

Step-by-step onboarding

From blank product to a tested personalization campaign

The Starter Pack brings the complete practical workflow together in one place, including screenshots, production file guidance, Snapwear templates and troubleshooting tips.

Open Personalization Starter Pack

FAQ

Teeinblue integration questions, answered

The essentials for Shopify sellers preparing their first personalized Snapwear product.

Is this a direct Teeinblue–Snapwear integration?

The workflow runs through Shopify. Your Shopify store must be connected to Snapwear, and the same product is then used in a Teeinblue campaign by Shopify product.

Do I need a Shopify store?

Yes. This specific Snapwear and Teeinblue workflow is designed for Shopify stores.

Is Teeinblue free?

Teeinblue is a separate paid Shopify app. At the time this page was prepared, the listed plan was $49 per month with a 14-day free trial and usage-based transaction fees after the first 100 monthly orders.

Does Snapwear charge an integration subscription?

No. Snapwear does not charge a monthly platform subscription. You pay for fulfilled products, selected add-ons and shipping.

Can I use both DTG and AOP products?

Yes, but the file setup is different. DTG artwork must be positioned inside the product's maximum print area, while AOP artwork must follow the dedicated panel template and safe-zone guidance.

Why is “Both Notes & Line item property” important?

It helps pass the Teeinblue order design URL and personalization information through Shopify so Snapwear can access the data required for production.

What can customers personalize?

Depending on your Teeinblue artwork, customers can edit text, names, colors, images, photos, characters, pets, layouts and other conditional design elements.

Where can I get help with the setup?

For Snapwear product specifications and fulfillment questions, contact support@snapwear.pro. For Teeinblue editor features, use the Teeinblue Help Center and app support.

Ready to launch a personalized product?

Let customers create the design. Let Snapwear handle the rest.

Connect Shopify with Snapwear, install Teeinblue and turn a blank product into a personalized offer produced only after it sells.