When you use our Services, we collect information about your visit and how you navigate them. For this purpose, we use cookies and are the administrator of your personal data. Information about your rights, our contact details and the data protection officer, the legal basis for processing, the recipients of your data, the period of storage and the voluntary provision of data and the consequences of not providing it can be found here. In our Privacy Policy, you can read about cookies at any time - technical, analytical, social media and marketing cookies and how to disable them.
A practical guide to creating personalized Snapwear products with Teeinblue — from the first blank product and artwork setup to mockups, testing and production-ready orders.
Integration→Artwork basics→DTG / Sublimation or AOP→Campaign→Mockup→Test→Launch
01 — Integration setup
Connect Snapwear, Shopify and Teeinblue
Shopify connects the Snapwear product and fulfillment workflow with the Teeinblue personalization experience.
Complete this setup once before you start building personalized products.
Before you begin
Connect Shopify to SnapwearStep-by-step Shopify integration guide
Done: once the store connection and required Teeinblue setting are ready, you can prepare your personalization assets.
02 — Artwork basics
Prepare personalization before you build the product
These rules are common to DTG, sublimation and AOP. This section explains how to prepare customer choices,
assets and layers in Teeinblue. Production canvas rules are covered inside the DTG / sublimation and AOP workflows.
1. Decide what changes and what stays fixed
Before opening Teeinblue, split the design into fixed and personalized elements.
FIXED
decorative graphics
static text
background elements
PERSONALIZED
name
date
clipart choice
uploaded photo
color
layout option
2. Prepare every swappable graphic in advance
If the customer can replace an illustration — for example a dog breed, character, hairstyle, flower or icon —
prepare every available option as a separate asset before building the artwork.
Use one file per option.
Keep the same visual style across the set.
Use the same canvas size and aspect ratio.
Keep the subject at a similar visual scale and position.
Use transparent backgrounds when the background should not print.
Name files clearly.
Why consistency matters: if one replacement graphic is more zoomed in or has different transparent margins,
it can jump in size or position when the customer changes the option.
3. Organize reusable graphics in Assets
In Teeinblue, go to Assets and create a Clipart Category for the selectable graphics.
For example, a pet design can use a category called Dog Breeds.
Assets → Clipart Categories → Dog Breeds. Keep selectable graphics organized in one reusable category.
Labels should describe the choice exactly as the customer understands it:
Choose your dog breed, Dog's name, Upload your photo.
Keep fixed elements hidden from the personalization form.
6. Use Artwork Templates for different layouts
Use Artwork Templates when the customer's choice changes the structure of the design — for example, choosing 1, 2 or 3 dogs. Each Template can contain a different number, size and position of layers, as well as different personalization options.
Same layout, different graphicBeagle → French Bulldog → German ShepherdUse a Clipart Category
Different layout1 dog → 2 dogs → 3 dogsUse Artwork Templates
In Teeinblue: open the Artwork and use the Template tabs in the Artwork Editor. Duplicate the current Template or click + to create a new one.
7. Create a repeating pattern from one customer choice
If the same personalized graphic should appear several times in the design, create the first
Clipart Category layer and make the repeats with Duplicate & Link.
Linked copies use the same customer choice, so the customer selects the clipart only once.
Choose your dog breed → French Bulldog
source layer → French Bulldog
linked copy #1 → French Bulldog
linked copy #2 → French Bulldog
linked copy #3 → French Bulldog
...
Move and transform the linked copies to build the repeat. Changing the source choice updates all linked copies together.
Example of a personalized repeat pattern in Artwork 2.0 — linked copies can be positioned independently, while one customer choice updates all repeated dog heads.
Normal DuplicateCreates another independent personalization option.Do not use for one shared pattern choice
Duplicate & LinkCopies the layer while keeping the personalization linked to the source.Use for repeating personalized elements
For AOP: a repeating personalized design can cover a production template,
but the mockup still needs the correct product-specific print-area / panel mapping.
8. Test realistic customer input
Try short and long names.
Switch between graphics with different shapes.
Check every layout customers can choose.
Keep important elements away from unsafe edges.
Next: choose the production workflow for your product — DTG / sublimation or AOP.
03 — First DTG / sublimation product
Create your first product with a standard print area
Follow this workflow from the Snapwear product to the final tested Teeinblue campaign.
Use it for DTG and sublimation products with a defined rectangular print area.
Open Product Files and find the product, placement and dimensions you want to use.
Build the production canvas from those dimensions — not from the visible size of the logo or illustration.
Example used in this guide: Gildan 6400, Front — 39 × 49 cm.
At 300 DPI, the working canvas used in this example is approximately 4606 × 5787 px.
A small design still sits inside the full production canvas. Do not crop the canvas down to the visible artwork.
IncorrectIncorrect — canvas cropped to the artwork.CorrectCorrect — keep the full print-area canvas and position the artwork inside it.
Step 2 — Create the blank product in Snapwear
Go to My Assortment → Create blank. Select the product, variants and print placement,
complete the product setup and save it. Then publish the product to your connected Shopify store.
Snapwear → My Assortment → Create blank.
After this step: the blank Snapwear product should exist in Shopify with the variants and print placement you selected.
Step 3 — Create the Teeinblue Artwork at production size
Go to Artworks → + New Artwork.
Artworks → create a new Artwork 2.0.
Choose Custom size and enter the production canvas dimensions for the exact product and placement.
Enter the production dimensions from Product Files.
Step 4 — Add the personalization layers
Build the artwork using the assets and layer logic from Artwork Basics.
Add only the customer-editable elements that the product actually needs.
Example
Dog Breeds → Clipart Category
Dog's name → Single-line Text
My best friend → No personalization
Step 5 — Create a Campaign by Shopify product
Go to Campaigns → by Shopify products → + New Campaign.
Select the Shopify product published from Snapwear, create the campaign and select the Artwork prepared for this print placement.
Use Campaigns → by Shopify products for the product already published from Snapwear.
Add a clean product image and map the corresponding print area onto the visible product.
Position and scale the preview so it represents the real placement.
Mockup Editor: map the artwork to the visible product area. This affects the preview, not the production canvas.
Mockup ≠ production file. Never fix an incorrect production layout only by changing the mockup.
Shopify collection and catalog pages use the product's featured media rather than the Teeinblue live personalization preview.
Add one attractive finished personalized mockup as the first Shopify product image.
Step 7 — Generate a test design and launch
Before launch, use Generate test design. Enter realistic personalization values and inspect the generated file.
Check the final production design — not only the live mockup.
Generate a test design and verify the final output before launch.
Check the longest customer input you allow.
Switch through important clipart options.
Confirm the Shopify product is published to the Online Store sales channel.
Launch the campaign only after the generated design is correct.
Finished: the product should now be available in Shopify with Teeinblue personalization and a verified production design.
04 — First AOP product
Create your first All-Over Print product
AOP uses a product-specific production grid rather than one standard rectangular print area.
Start from the exact Snapwear template for the product and build personalization inside that full production canvas.
Production template→AOP artwork→Blank product→Campaign→Mockup without editable elements→Personalized preview→Test design
Step 1 — Download the exact product template
Do not reuse a visually similar garment template. Open the Snapwear AOP template library and use the file assigned to the exact product.
The template defines the full production canvas and the position of the product parts inside it.
Step 2 — Create the AOP Artwork at the full production-grid size
In Artworks → + New Artwork, enter the width and height of the complete Snapwear production grid.
Do not create separate Artwork canvases for front, back, sleeves or collar when the product uses one full production file.
Those product parts are positioned inside the same canvas.
Hawaiian shirt example: the tested customer production file uses one full canvas of
12289 × 5906 px at 300 DPI. Front, back and the smaller garment parts are arranged inside this single file.
Treat this as an example for this product — always use the dimensions listed for the exact AOP product.
AOP production template — one full artwork canvas can contain multiple garment parts, such as front, back, sleeves and collar.
If your source design is larger than the product template:
resize the source artwork proportionally to the exact production-grid dimensions before building personalization.
Do not invent a different canvas size just because the original graphic file is larger.
Step 3 — Build the fixed AOP background on the template
Add the non-personalized design first — for example a tropical background or seamless pattern.
Position it so every product part that should be printed is covered.
Keep the production canvas size and ratio unchanged.
Use the product shape lines / template only as a placement guide.
Cover every garment part that should receive print.
Extend repeating backgrounds far enough to avoid unprinted gaps.
Keep important faces, logos and text away from seams and uncertain cut lines.
TOPPersonalized elements
Dog heads, customer photos, names or other editable content.
BASEFixed AOP background
Tropical pattern, decorative graphics or another non-editable design.
GUIDESnapwear production template
Use it to understand where front, back, sleeves, collar or other parts are located.
Step 4 — Add personalization on top of the fixed background
Add editable elements as separate Teeinblue layers. For example, a Hawaiian-shirt design can use a fixed tropical background
with personalized dog heads placed above it.
Completed AOP artwork example — a fixed background pattern with personalized clipart placed across the full production canvas.
Fixed layer
Hawaiian background → No personalization
Personalized layer
Dog breed → Clipart Category
Repeating the same customer choice
Dog breed → Duplicate & Link → position copies around the AOP grid
If the same clipart should appear several times, use Duplicate & Link.
The copies can be placed in different parts of the production grid while the customer chooses the breed only once.
Alternative AOP composition — the same production canvas can also use larger image-based elements assigned to different garment parts.
Create and publish the AOP product from Snapwear to Shopify.
Then use Campaigns → by Shopify products, select that Shopify product and connect the AOP Artwork.
Production file first: before working on the storefront mockup, make sure the Artwork itself is built on the correct
Snapwear production grid. The mockup does not redefine the production file.
Step 6 — Prepare the AOP mockup without the editable personalization
For AOP, do not try to force the complete flat production grid into the shape of the product photo.
Prepare the customer-facing mockup as a separate visual.
Create a mockup that already contains the fixed product design — for example the Hawaiian shirt with its tropical background —
but leave out the elements that the customer will change.
Customer clipart, photo, name or other personalization placed over the mockup.
→
3Live personalized preview
The customer sees the fixed product plus their selected editable content.
Key AOP mockup principle:
upload the mockup without the editable clipart / personalization, then let Teeinblue place the customer-editable element on top.
The mockup is a preview; the full production grid remains the order design.
Optional realism layer:
if the personalized element looks too flat, a transparent overlay with fabric shadows / folds can be prepared above the editable artwork.
Document this only for mockups where it is actually needed.
Step 7 — Generate a test design
Use Generate test design with realistic personalization.
Inspect the generated order design and confirm that the fixed background and all personalized elements remain correctly positioned
on the full production grid.
Check the entire flat production file, not only the storefront mockup.
Confirm personalized elements do not fall into unwanted seams or cut areas.
Test very different clipart shapes or customer images.
Compare the generated file with the exact Snapwear product template.
Launch only after both are correct:
the storefront mockup should make sense for the customer, and the generated AOP order design must remain correct for production.
05 — Product files
Use the right production file for the right product
Download the official Snapwear AOP production templates below. Product-specific print-area dimensions and working canvas data will be added once the verified Product Files are ready.
Snapwear AOP templatesDownload the official production grids for supported AOP products.
Start with the part of the workflow that is actually wrong
Most problems come from the product connection, production dimensions, personalization logic, mockup preview or generated order design.
The Snapwear product is missing when creating the campaign
Confirm that the blank product was published to Shopify and that you are using Campaigns → by Shopify products in the correct store.
The personalization form is missing from the storefront
Check that the correct campaign was launched and connected to the correct Shopify product.
The live preview is too large, too small or misplaced
Check the mockup mapping first. Do not resize the production canvas only to fix the preview.
The generated design is cropped or placed incorrectly
Check the production canvas / template. For a standard print area, the artwork should sit inside the full product canvas rather than on a cropped canvas around the visible design.
Replacement graphics jump in size or position
Compare their source canvases, transparent margins, scale and framing. Swappable assets should be prepared consistently.
Personalized text breaks the layout
Test the longest allowed value, reduce the character limit or create a different layout when needed.
The personalized design is missing from the order workflow
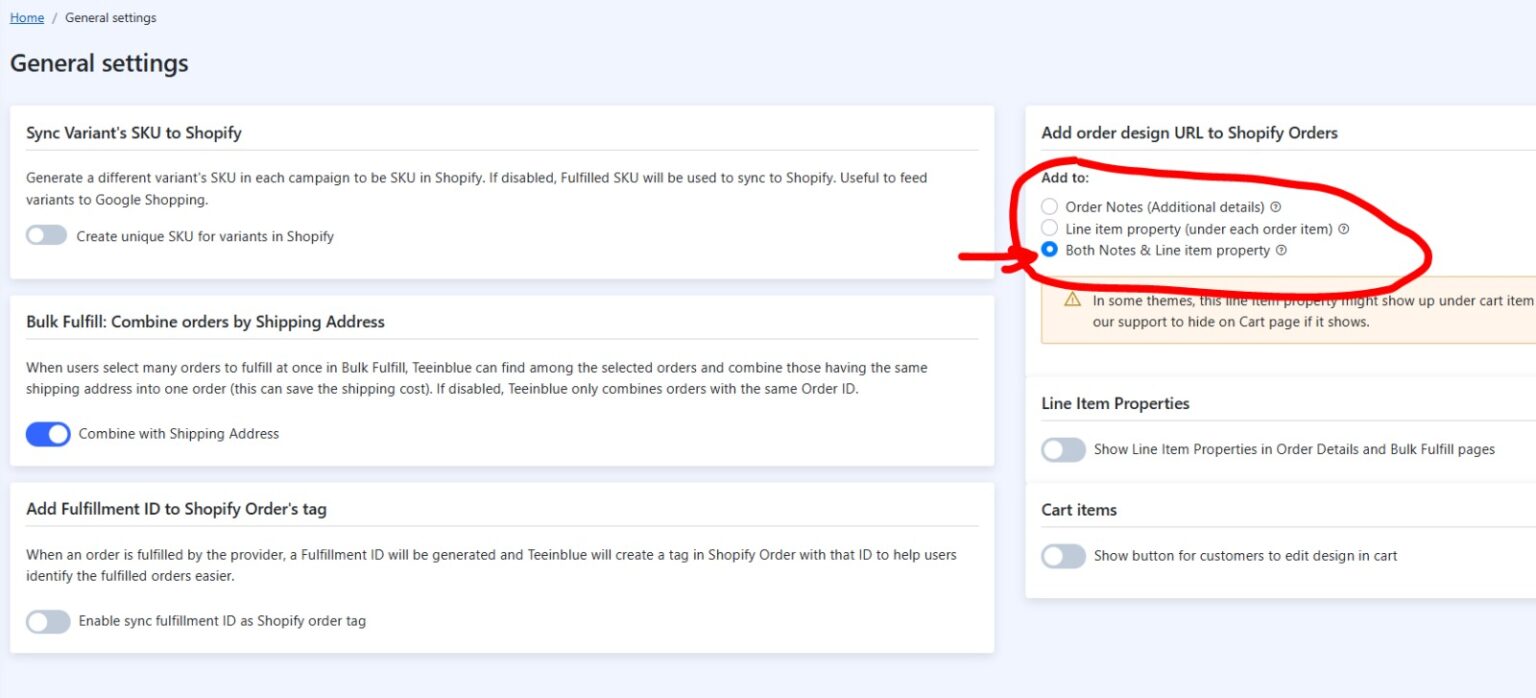
Check Store Settings → General settings → Add order design URL to Shopify Orders
and confirm Both Notes & Line item property is selected.
An AOP preview looks fine but the production file is wrong
The mockup does not redefine the production design. Re-check the exact AOP template, product-specific areas and generated order design.
Still not sure?
Send support enough information to reproduce the setup:
Shopify store URL,
Snapwear product name and SKU,
Teeinblue campaign name,
screenshot or short screen recording,
order ID if the issue concerns an order,
artwork / product template if the issue concerns placement.
07 — Resources & support
Useful links
Use this Starter Pack for the Snapwear-specific workflow and official Teeinblue documentation for deeper editor features.